
介绍
ELK是三个开源软件的缩写,分别表示:Elasticsearch , Logstash, Kibana , 它们都是开源软件。新增了一个FileBeat,它是一个轻量级的日志收集处理工具(Agent),Filebeat占用资源少,适合于在各个服务器上搜集日志后传输给Logstash,官方也推荐此工具。
Elasticsearch是个开源分布式搜索引擎,提供搜集、分析、存储数据三大功能。它的特点有:分布式,零配置,自动发现,索引自动分片,索引副本机制,restful风格接口,多数据源,自动搜索负载等。详细可参考Elasticsearch权威指南
Logstash 主要是用来日志的搜集、分析、过滤日志的工具,支持大量的数据获取方式。一般工作方式为c/s架构,client端安装在需要收集日志的主机上,server端负责将收到的各节点日志进行过滤、修改等操作在一并发往elasticsearch上去。
Kibana 也是一个开源和免费的工具,Kibana可以为 Logstash 和 ElasticSearch 提供的日志分析友好的 Web 界面,可以帮助汇总、分析和搜索重要数据日志。
Beats在这里是一个轻量级日志采集器,其实Beats家族有6个成员,早期的ELK架构中使用Logstash收集、解析日志,但是Logstash对内存、cpu、io等资源消耗比较高。相比 Logstash,Beats所占系统的CPU和内存几乎可以忽略不计
Redis是一个高性能的内存key-value数据库,非必需安装,可以防止数据丢失。缓存。
ELK Stack (5.0版本之后)—> Elastic Stack == (ELK Stack + Beats)。目前Beats包含六种工具:
Packetbeat: 网络数据(收集网络流量数据)
Metricbeat: 指标 (收集系统、进程和文件系统级别的 CPU 和内存使用情况等数据)
Filebeat: 日志文件(收集文件数据)
Winlogbeat: windows事件日志(收集 Windows 事件日志数据)
Auditbeat:审计数据 (收集审计日志)
Heartbeat:运行时间监控 (收集系统运行时的数据)
架构
单机架构(适合少量日志)
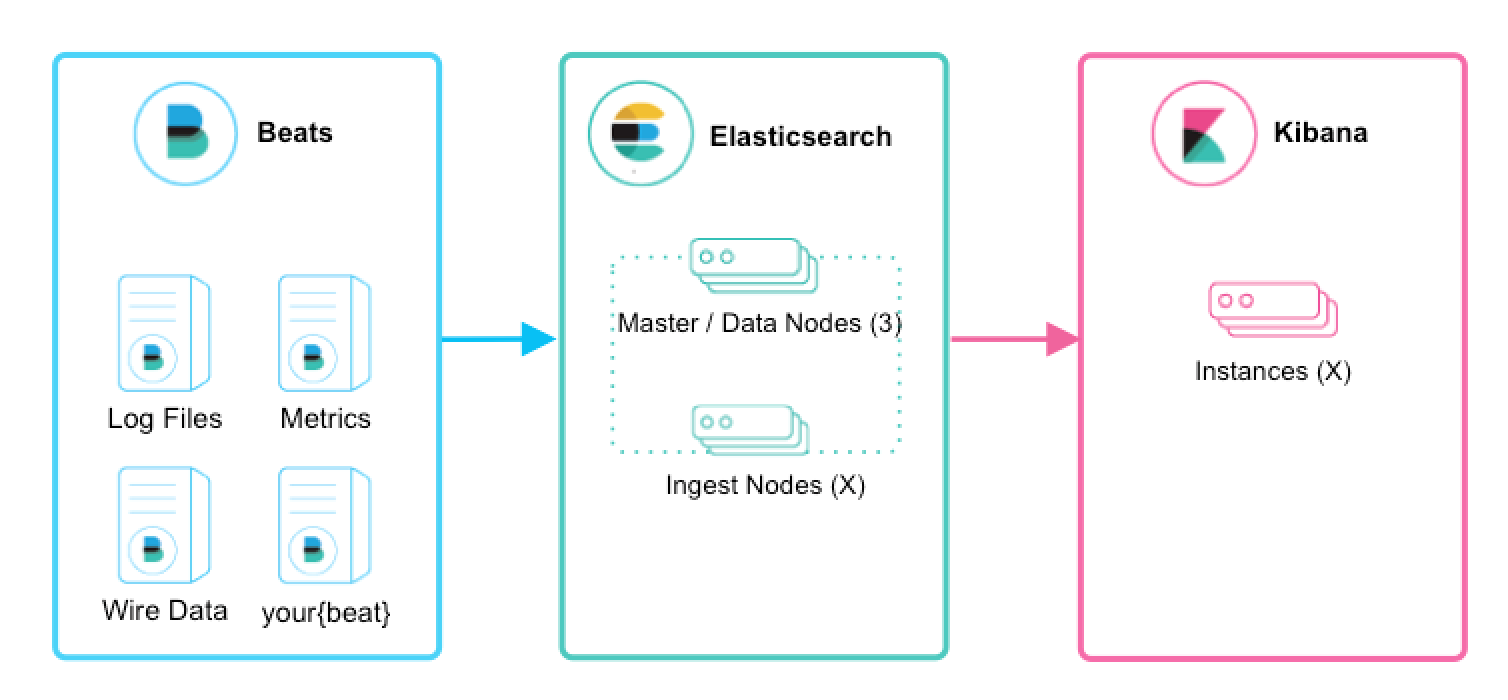
elasticsearch新版本已经可以对日志文件进行预处理,不用添加臃肿的logstash,filebeat直接输出到elasticsearch,使用ingest pipeline来解析日志文件,再保存索引。但该ingest process处理能力有限,只适合单机架构的少量日志。
详见官方文档:
https://www.elastic.co/guide/en/beats/filebeat/7.9/load-ingest-pipelines.html
官方给出比较简单直接粗暴的模板来生成索引,包含多个字段,已经完全满足你想要的一切信息,而且能根据索引快速生成漂亮的dashboard
配置filebeat.yml
只需在默认配置上module模块和output模块
1 | # ============================== Filebeat modules ============================== |
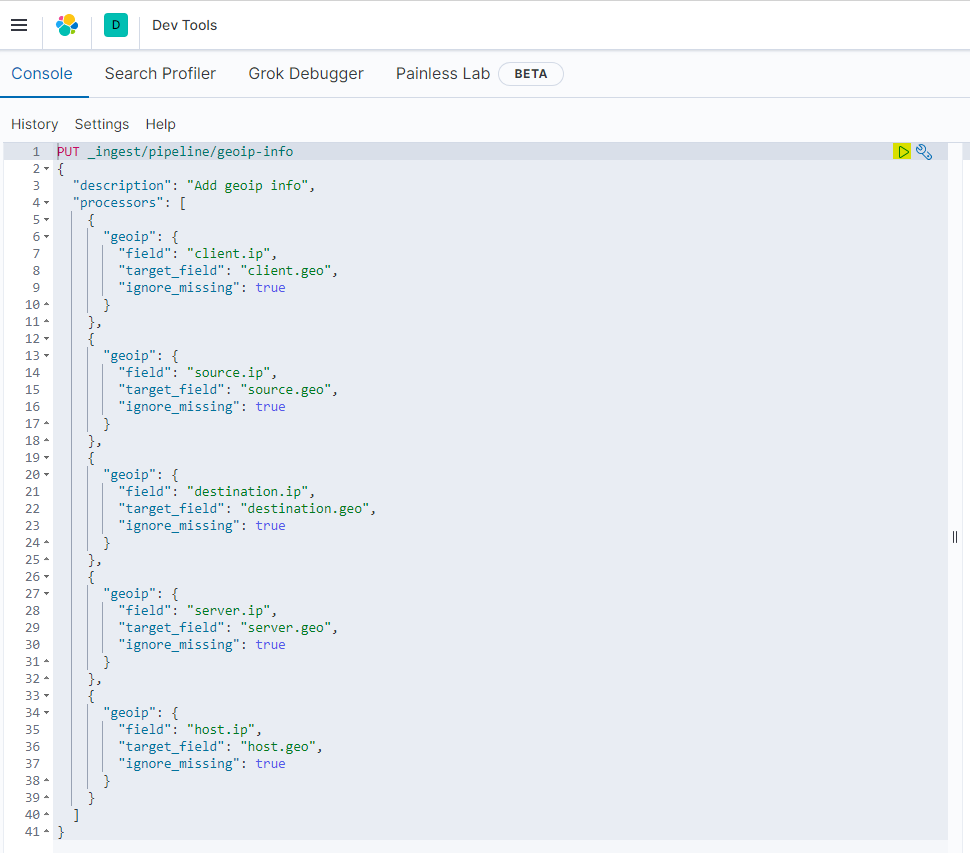
ouput到elasticsearch的配置中添加pipeline: geoip-info,意味着使用elasticsearch的geoip pipeline,默认elasticsearch不存在这个pipeline,需要手动在kibana上添加。
1 | PUT _ingest/pipeline/geoip-info |
官方说明:
https://www.elastic.co/guide/en/beats/filebeat/7.9/filebeat-geoip.html
命令行配置开启对应模块filebeat modules enable nginx,system
这样就开启了nginx和system的模块,相当于修改了/etc/filebeat/modules.d/下的nginx.yml.disable,去掉.disable
修改模块配置文件vim /etc/filebeat/modules.d/nginx.yml
1 | - module: nginx |
修改对应的日志文件路径,nginx最后一个ingress是在k8s上使用的,如果不是k8s环境,则配置为false
命令行配置filebeat处理filebeat setup --pipelines --modules nginx,system
官方说明:
https://www.elastic.co/guide/en/beats/filebeat/7.9/load-ingest-pipelines.html
运行filebeat并输出到屏幕
可以先检查下配置文件和输出是否正常filebeat test config
Config OK
filebeat test output
1 | elasticsearch: http://elastics.xxx.com... |
运行filebeat并输出屏幕filebeat -e -d "publish"
从屏幕可以看出详细的输出信息,最后到kibana上就会看到创建的pipeline
每个日志文件对应一个pipeline来处理,是通过filebeat的field.yml配置文件来生成的。
建立索引后,可以看到,从模板配置处理的索引含有非常多的字段(有4839个),完全满足我们想要的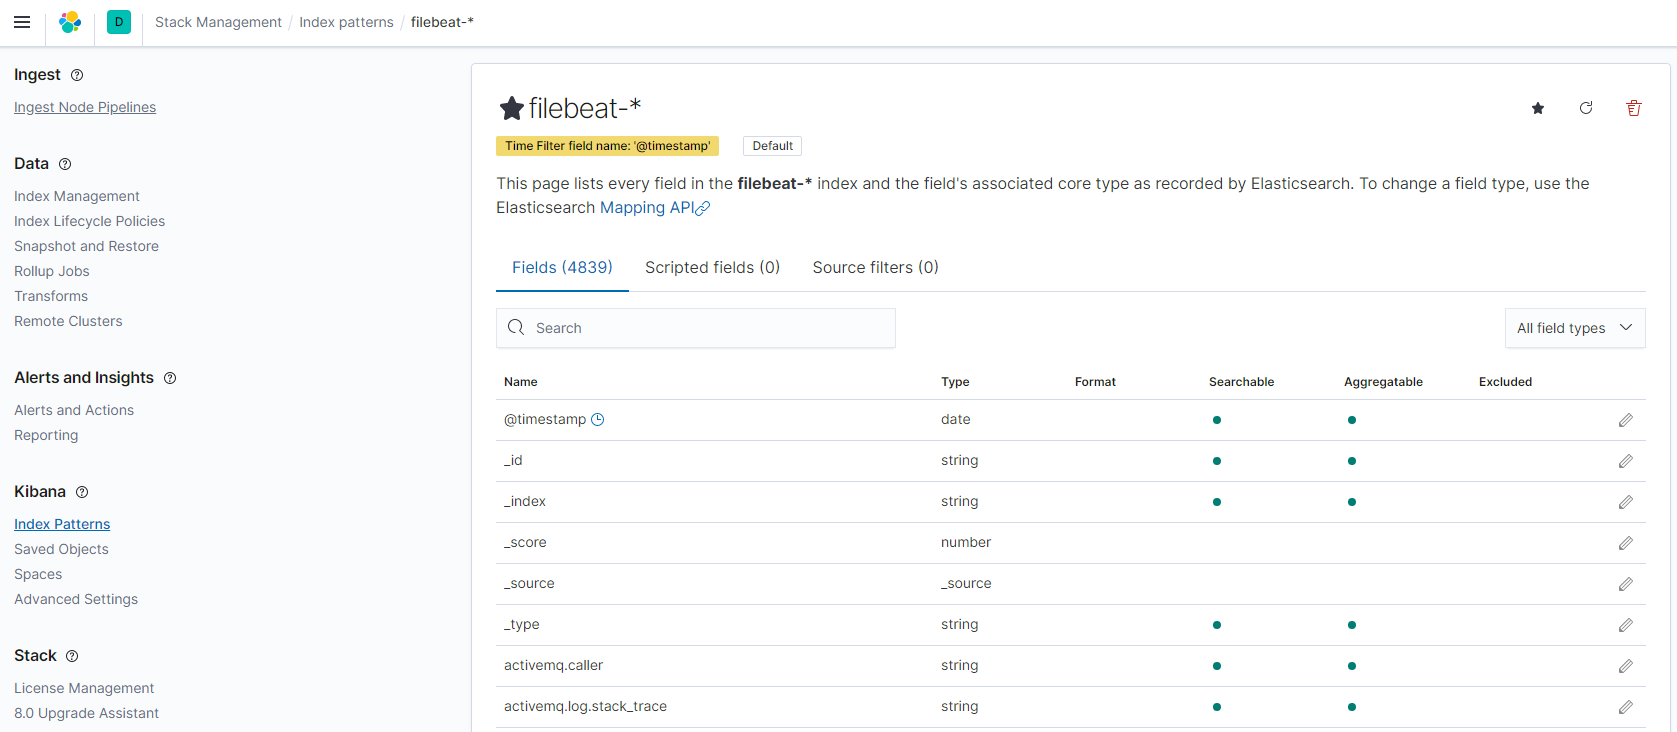
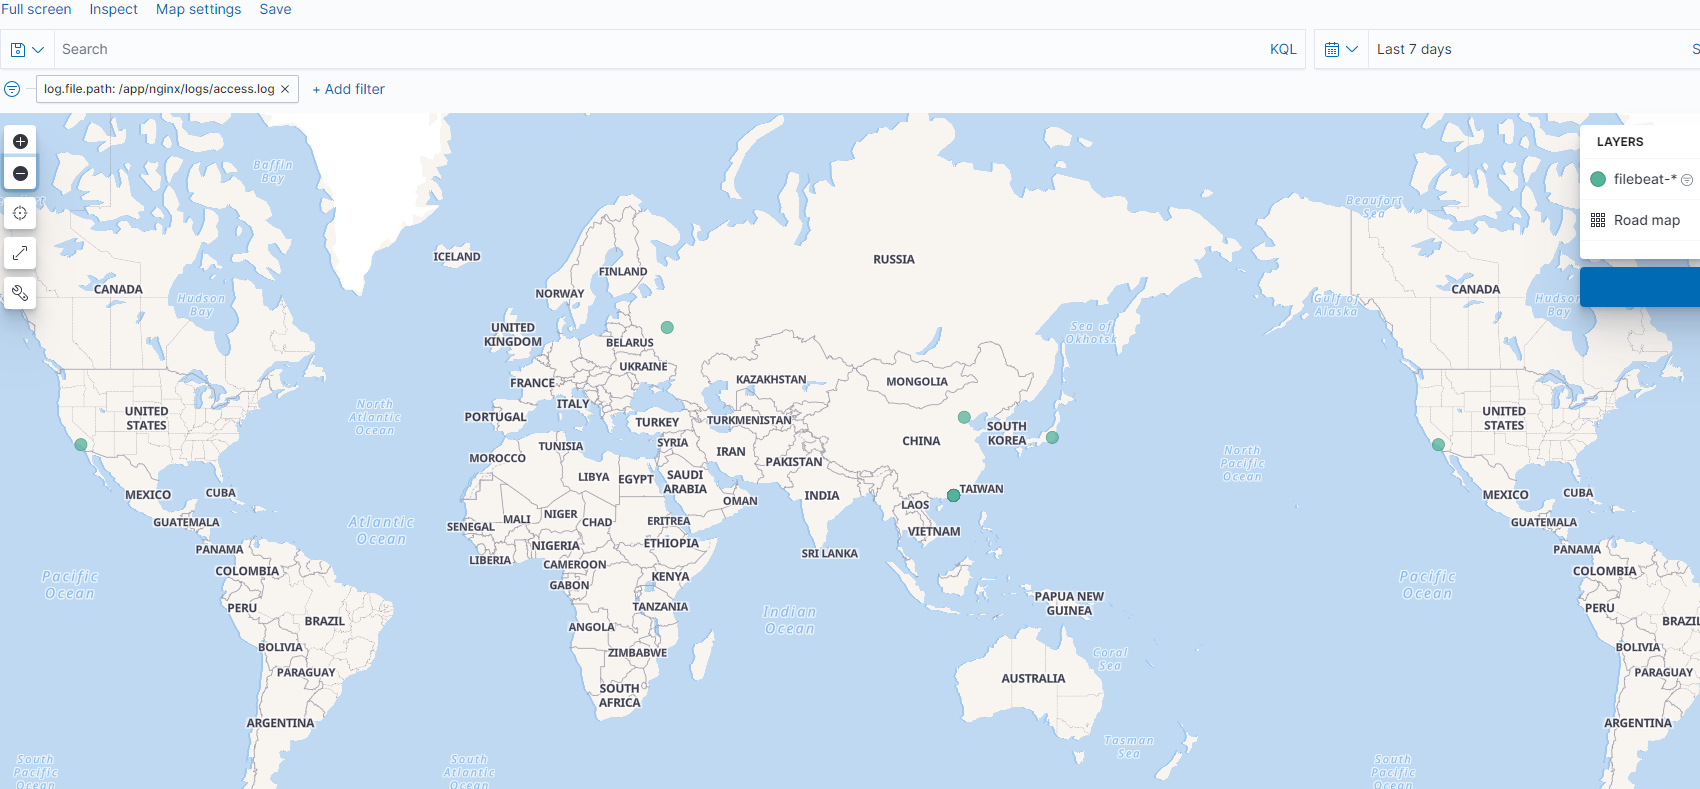
打开discover,可以看到生成了geoip的相关信息,可以直接点击查看访问的IP分布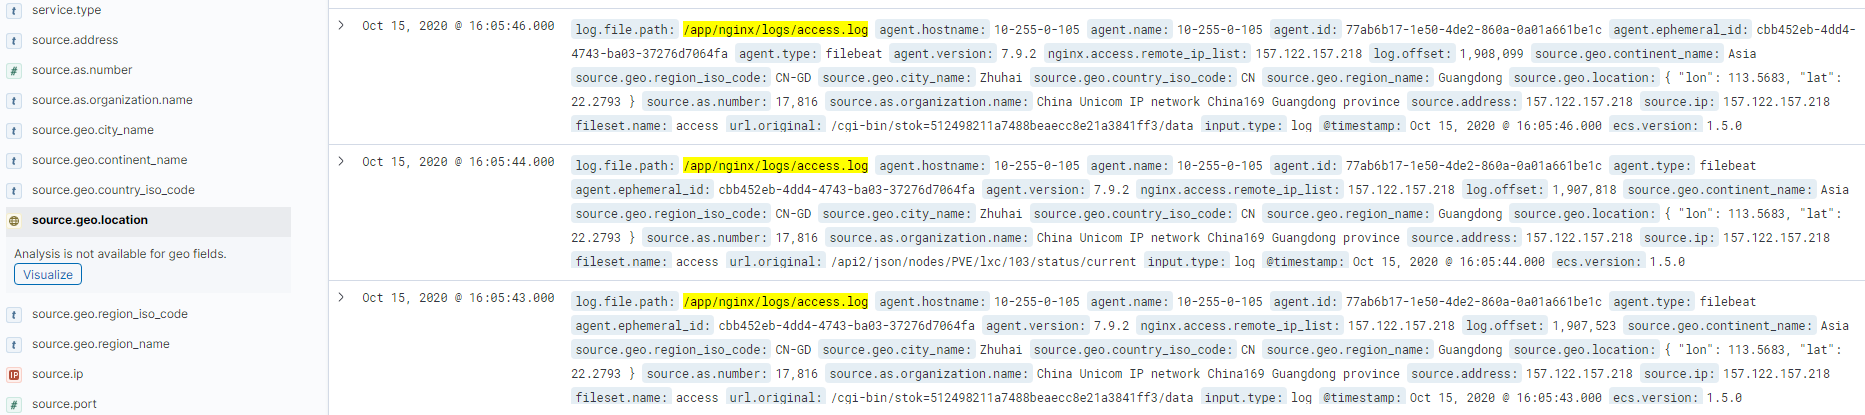
配置dashboard
filebeat提供很多官方的dashboard,通过修改配置文件来打开dashboard,前提需要kibana服务器可达。
修改filebeat.yml
1 | # ================================= Dashboards ================================= |
执行setupfilebeat setup --dashboards
回到kibana,打开dashboard,就会看到生成了很多dashboard模板
搜索nginx,就能生成nginx的dashboard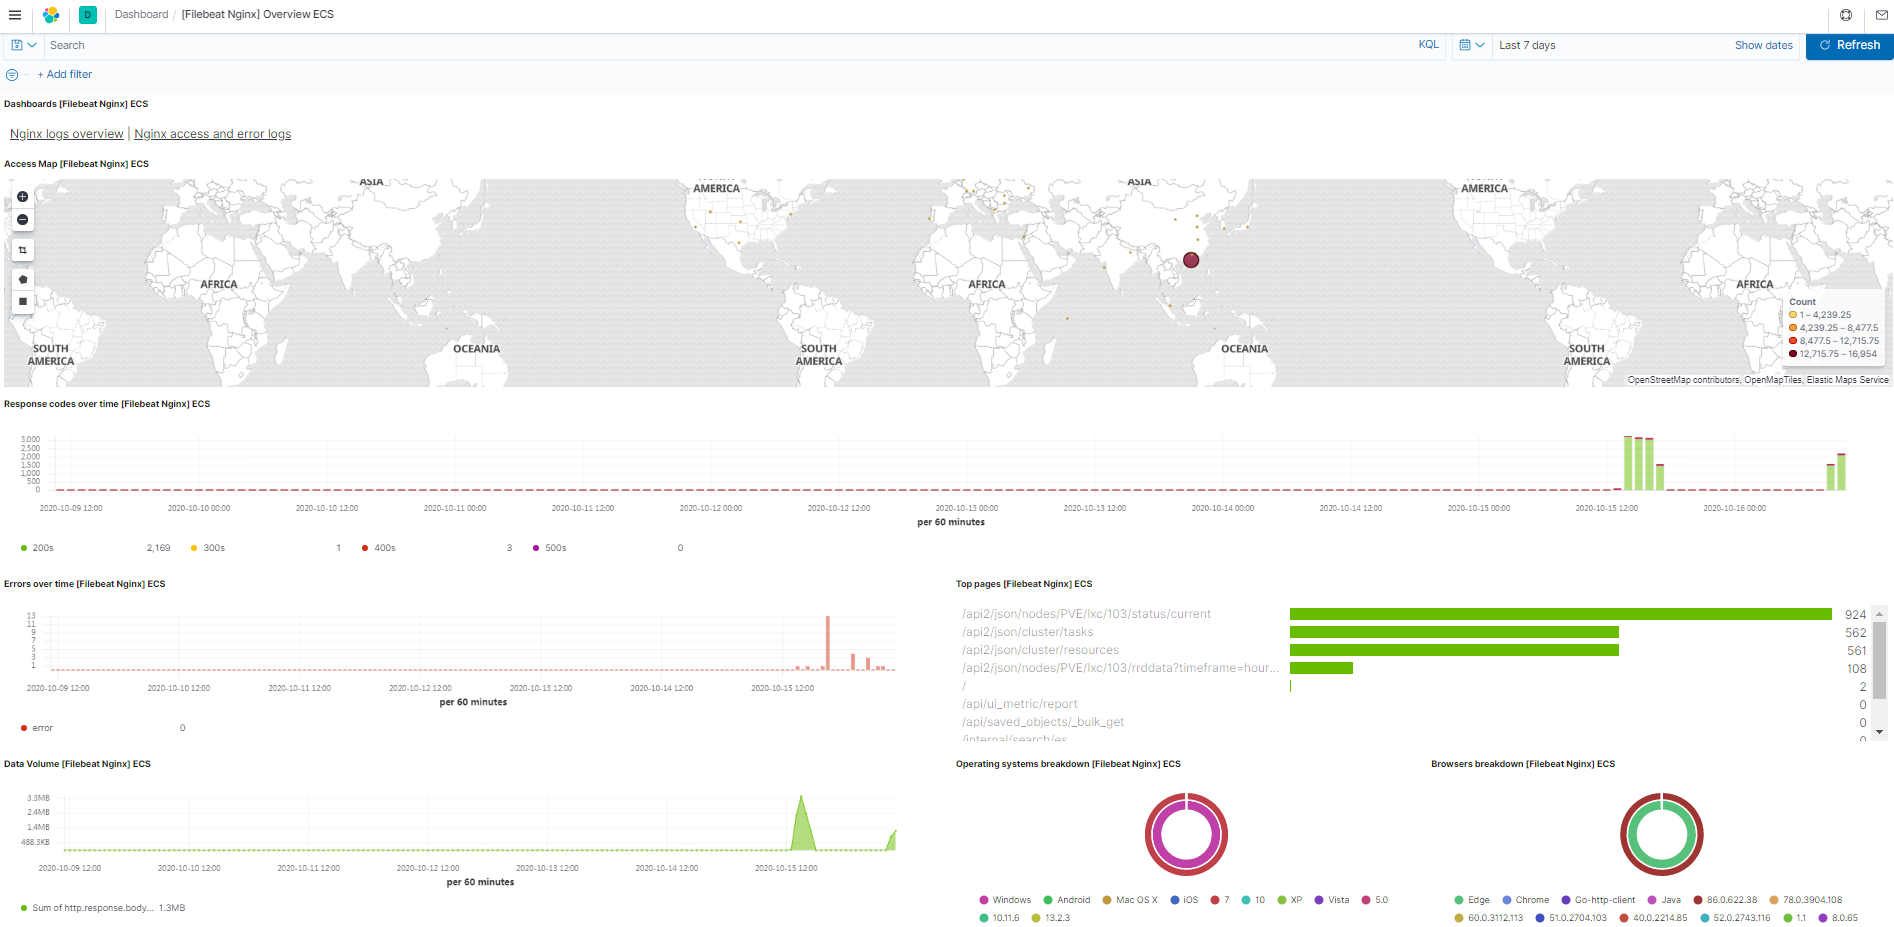
使用这种架构是方便,但是可以看到,索引的名字并不好分类和修改,都是默认生成的,而且不能自定义解析的字段,全部索引到到一个索引文件了,好在kibana的筛选功能够强大。如果用logstash的grok就不会有这个问题。
中等量日志架构
先用logstash读取Nginx日志和系统日志写入kafka,再用logstash读取出来写入elasticsearch,适合日志量不是太多的架构。
其实用redis也可以,redis没必要开快照和持久化,数据写入es后redis的作用就完成了。当然很耗redis内存,一般8-16G。
后端可能几十台logstash往kafka写入,如果kafka内存居高不下,也就是前端的logstash读的太慢,要加logstash。直到平衡。
海量日志架构
官方传统,使用filebeat输出到kafka,再用logstasha读取处理写入elasticsearch,如果觉得卡,则可以用第二种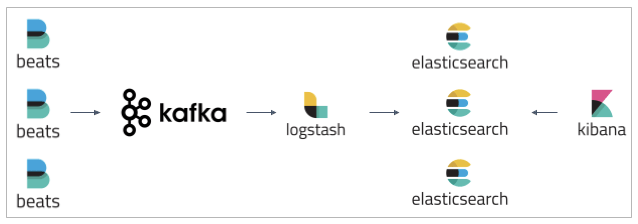
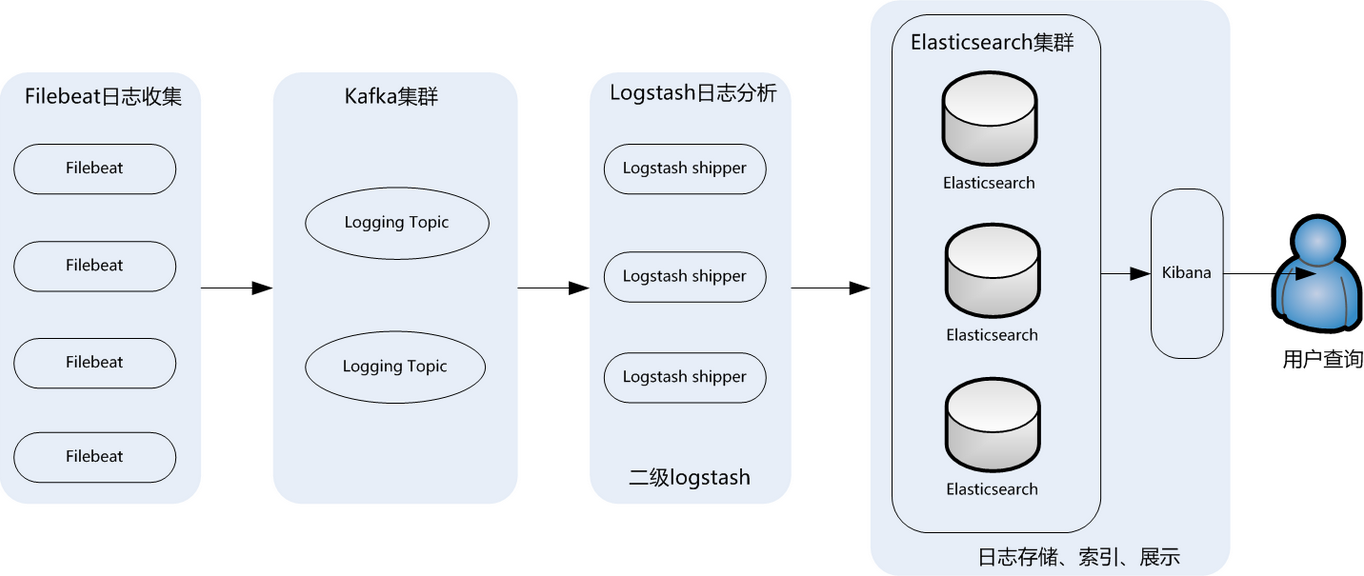
如果还是遇到性能瓶颈
使用filebeat收集日志,先转发到beat端的logstash1,然后logstash1转发到kafka,然后再由logstash2从kafka读取写到elasticsearch。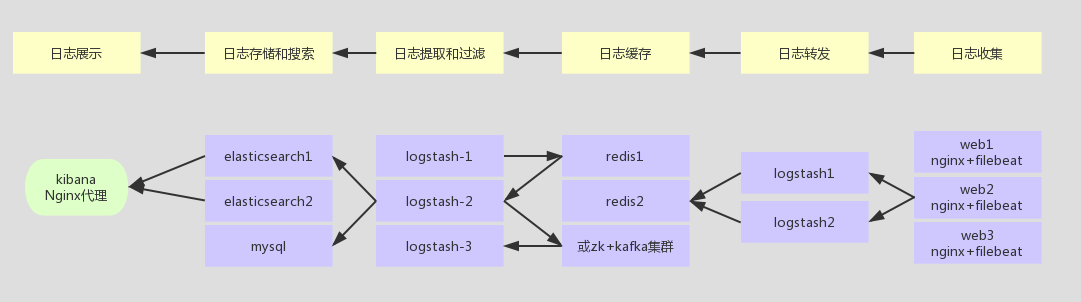
https://mp.weixin.qq.com/s/F8TVva8tDgN0tNsUcLoySg
整个系统一共含有10台主机(filebeat部署在客户端,不计算在内),其中Logstash有四台,Elasticsearch有二台,Kafka集群三台,kibana一台并配置Nginx代理。
架构解释:
(1)首先用户通过nginx代理访问ELK日志统计平台,这里的Nginx可以设置界面密码。
(2)Nginx将请求转发到kibana
(3)kibana到Elasticsearch中去获取数据,这里的Elasticsearch是两台做的集群,日志数据会随机保存在任意一台Elasticsearch服务器。
(4)Logstash1从Kafka中取出数据并发送到Elasticsearch中。
(5)Kafka服务器做日志数据的持久化保存,避免web服务器日志量过大的时候造成的数据收集与保存不一致而导致日志丢失,其中Kafka可以做集群,然后再由Logstash服务器从Kafka持续的取出数据。
(6)logstash2从Filebeat取出的日志信息,并放入Kafka中进行保存。
(7)Filebeat在客户端进行日志的收集。
注1:【Kafka的加入原因与作用】
整个架构加入Kafka,是为了让整个系统更好的分层,Kafka作为一个消息流处理与持久化存储软件,能够帮助我们在主节点上屏蔽掉多个从节点之间不同日志文件的差异,负责管理日志端(从节点)的人可以专注于向 Kafka里生产数据,而负责数据分析聚合端的人则可以专注于从 Kafka内消费数据。所以部署时要把Kafka加进去。
而且使用Kafka进行日志传输的原因还在于其有数据缓存的能力,并且它的数据可重复消费,Kafka本身具有高可用性,能够很好的防止数据丢失,它的吞吐量相对来说比较好并且使用广泛。可以有效防止日志丢失和防止logsthash挂掉。综合来说:它均衡了网络传输,从而降低了网络闭塞,尤其是丢失数据的可能性,
注2:【双层的Logstash作用】
这里为什么要在Kafka前面增加二台logstash呢?是因为在大量的日志数据写入时,容易导致数据的丢失和混乱,为了解决这一问题,增加二台logstash可以通过类型进行汇总分类,降低数据传输的臃肿。
如果只有一层的Logstash,它将处理来自不同客户端Filebeat收集的日志信息汇总,并且进行处理分析,在一定程度上会造成在大规模日志数据下信息的处理混乱,并严重加深负载,所以有二层的结构进行负载均衡处理,并且职责分工,一层汇聚简单分流,一层分析过滤处理信息,并且内层都有二台Logstash来保障服务的高可用性,以此提升整个架构的稳定性。
接下来分别说明原理与各个组件之间的交互(配置文件)。