
部署到github
nodejs环境
hexo基于node.js,需要在该环境下进行操作
本人在proxmox ve里面下载debain10-turnkey-nodejs模板,省去了搭建的烦恼
使用ssh工具到创建的容器上执行
修改npm为国内淘宝源:npm config set registry https://registry.npm.taobao.org
更新npm版本npm install -g npm
查看npm和node版本npm -vnode -v
安装hexo-clinpm install -g hexo-cli
查看hexo版本:hexo -v
github环境
注册github账号
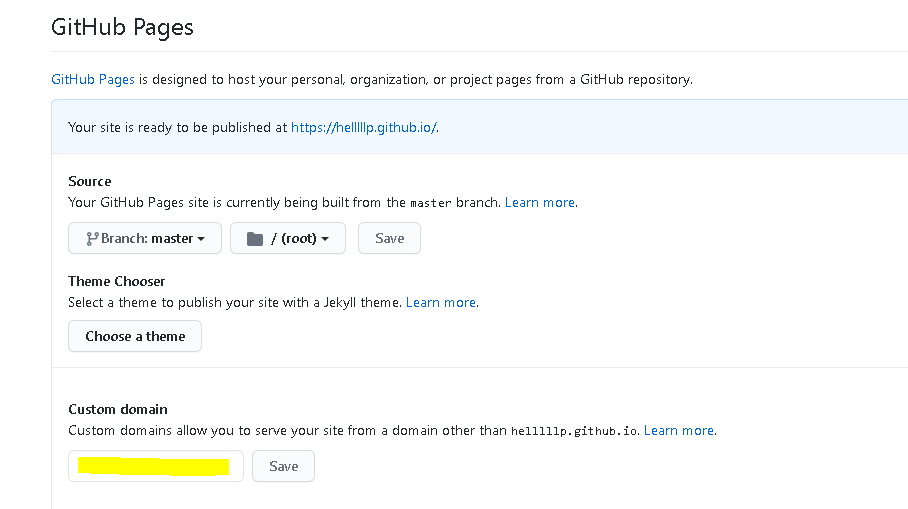
新建仓库,仓库名应该为:用户名.github.io,以这种方式命名,github会自动认为是web项目,会自动建立custom_pages的选项,可以添加域名
回到容器上执行
设置user.name和user.email配置信息git config --global user.name "你的GitHub用户名"git config --global user.email "你的GitHub注册邮箱"
生成ssh密钥文件ssh-keygen -t rsa -C "你的GitHub注册邮箱"
直接回车到最后
找到生成的.ssh的文件夹中的id_rsa.pub密钥,将内容全部复制
打开GitHub_Settings_keys 页面,新建new SSH Key
Title为标题,任意填即可,将刚刚复制的id_rsa.pub内容粘贴进去,最后点击Add SSH key。
在Git Bash中检测GitHub公钥设置是否成功,输入 :ssh git@github.com
如上则说明成功
域名
部署到github上可以使用github自带的域名,需要自定义域名则需要到各大网站申请一个域名。默认可以用用户名.github.io来访问你的hexo博客。申请域名后,进行域名绑定:
如我的域名为blog.hellshan.top,添加解析为我的github用户名.github.io,登录GitHub,进入之前创建的仓库,点击settings,设置Custom domain,输入你的域名即可
hexo初始化
执行hexo init blog
会在当前目录下生成blog文件夹,也就是你hexo网站项目的名称
在blog根目录里的_config.yml文件称为站点配置文件,根目录里的themes文件夹,里面也有个_config.yml文件,这个称为主题配置文件
将我们的Hexo与GitHub关联起来:cd blog/vim _config.yml
最后一行修改为
1 | deploy: |
如图:
安装git部署插件:npm install hexo-deployer-git --save
执行:hexo cleanhexo ghexo d
即提交成功,可以到你的github上看到
编辑博客文章
可以使用在线markdown编辑器编辑,可写即可见:http://marxi.co/,编辑完保存md文件,然后传到blog/source/_posts/下在提交到github就行
也可以使用markdown工具进行编辑如vscode
创建CNAME文件:
上面在github上绑定了域名,还不会生效,需要在项目目录下建立CNAME文件才生效:vim blog/source/CNAME
填上域名保存即可
再次运行hexo cleanhexo ghexo d
本地浏览:hexo s
本地浏览器输入IP:4000即可浏览
使用其他主题
在github上可以搜索Hexo的主题,下载下来放到theme文件夹,然后修改_config.yml中theme的名字即可
关联到netlify加速hexo
- 使用github账号登录netlify
- 安装步骤添加github托管的repository
- 手动更改netlify的域名,再自定义域名
- 修改阿里云域名cname为netlify的域名
- 取消github的自定义域名,清空后点save,会删除目录下的CNAME文件
- 删除hexo工作目录的CNAME文件,不然重新提交也会绑定
hexo问题处理
图片无法显示问题
hexo默认无法自动处理文章插入本地图片,需要通过扩展插件支持
配置_config.yml里面的post_asset_folder:false这个选项设置为true:vim blog/_config.yml
1 | post_asset_folder:true |
安装hexo-asset-image:npm install https://github.com/CodeFalling/hexo-asset-image --save
修改node_modules/hexo-asset-image/index.js,换成
1 | 'use strict'; |
在/source/_posts文件夹内新建一个与博客名称.md同名的文件夹,把图片放入该文件夹,然后使用直接插入图片即可。其中[]可以填图片的说明,会在图片下面生成。
再次提交时,gihub就会自动生成相关文件夹和上传图片。
markdown使用数学公式
hexo的默认md渲染器和标准不太一样,更接近与html格式,数学公式$之类的符号不能显示。同时使用的md语法可能在浏览器显示不正常。
首先更换新的渲染器:npm uninstall hexo-renderer-marked --savenpm install hexo-renderer-kramed --save
在根目录下开始(node_modules\kramed\lib\rules\inline.js)
修改以下两处:
1 | //escape: /^\\([\\`*{}\[\]()#$+\-.!_>])/, |
新增独立页面
在博客目录下执行hexo new page xxx,会在source目录下生成一个对应名字的文件夹,里面有index.md文件。
node.js会把我们写的md文件转化为HTML文件(在博客根目录中的public文件中可以查看)。Hexo 使用 Markdown(或其他渲染引擎)解析文章,利用我们使用的主题生成静态网页。有时候我们想自定义一个页面,它不受hexo的主题渲染。
使用hexo中提供配置的跳过渲染。在博客根目录中的配置文件(注意不是主题的配置问文件)_config.yml,找到“skip_render”配置。如果想设置某页面文章跳过渲染,则可以设置为
1 | skip_render: "xxx/**" |
添加关键字:
建立页面后,在主题配置文件_config.yml的menu下添加一项,如果没有关键字,则会显示index.xxx,需要手动添加下关键字
打开文档:blog/themes/next/languages/zh-Hans.yml,添加对应的mapping:
1 | menu: |
kibana嵌入web
上面设置独立页面后,取消渲染,就可以通过HTML代码来实现页面布局,可以添加kibana的dashboard,复制dashboard的链接,然后添加进html文件即可:
1 |
|
nodejs使用
npm install 很慢或者出错
手动下载安装包到~/.node-gyp/node版本号目录下再重新npm install就行
npm 手动安装
查看最新版本,为二进制包:
https://nodejs.org/dist/
下载最新版本:wget https://nodejs.org/dist/latest-v14.x/node-v14.13.1-linux-x64.tar.gz
解压tar xf https://nodejs.org/dist/latest-v14.x/node-v14.13.1-linux-x64.tar.gz
创建软链接:ln -s node-v14.13.1-linux-x64 node
添加系统环境变量:vim /etc/profile
最后添加上:
1 | #set for nodejs |
手动更新配置:source /etc/profile
查看node版本node -vnpm -v
关于网站备案
根据工信部要求,国内云主机建站80和443端口都需要备案,而且域名的www和主域名都要求能够访问,否则不能使用。申请域名后,可以在域名提供商控制台上添加绑定,可以添加www和@(直接解析主域名)的A记录,指向云主机IP。然后在云主机上搭建nginx,添加跳转:
1 | server { |
参考出处:
https://zhuanlan.zhihu.com/p/26625249
https://blog.csdn.net/weixin_43769146/article/details/105066795