
前言
很多企业(特别是制造业)都通过收费的软件进行共享文件服务器的备份,而中小企业基于成本问题,往往会使用免费的软件,例如feefilesync就是一个比较优秀的开源备份同步软件。但是有些场合需要用到实时同步,备份软件做不了实时同步或者只能做到文件量不大的同步,如feefilesync有实时同步功能,文件较少的时候还是挺好用的,可以做到以秒为单位的文件同步,缺点是每次同步的时候都会扫一遍目录,通过对比不同的文件再进行操作,如果文件目录有较多文件的时候,同步过程就会十分缓慢,会影响到生产业务,所以必须寻求一种可以实时同步的方案,当然可以通过程序员开发windows的程序,但是较为复杂。
inotify+rsync是linux下比较常用的实时同步方案,原理是通过inotify监控文件变化,再通过rsync软件同步到目标目录,Windows下是否也能使用?答案是可以的,部署比linux复杂一点。
准备
生产环境
文件服务器:192.168.1.189文件服务器windows server 2008
同步到:192.168.1.160
图: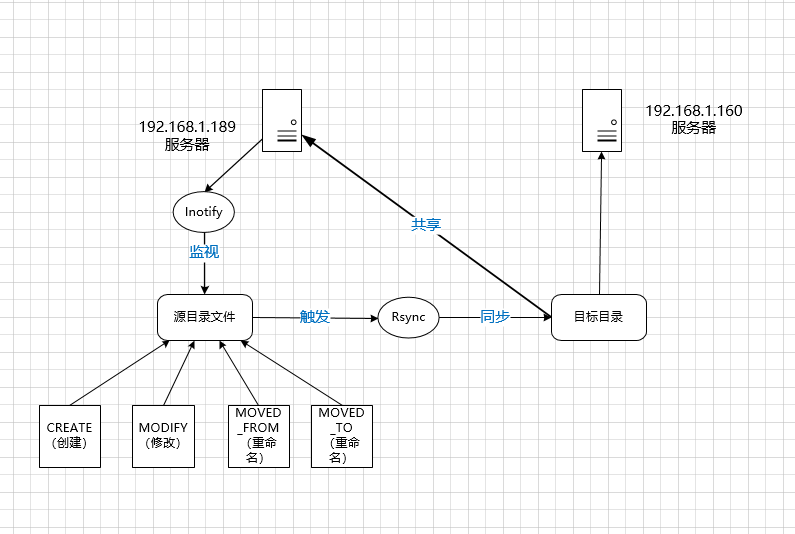
inotify
inotify是开源软件,thekid大神开发,可以在github获得源码:
https://github.com/thekid/inotify-win
然后,本地电脑安装.net4.0和开发模块,通过csc.exe来编译获得可执行文件:%WINDIR%\Microsoft.NET\Framework\v4.0.30319\csc.exe /t:exe /out:inotifywait.exe src\*.cs
rsync
windows下rsync叫cwrsync,通过网上搜索可以找到,分服务器端和客户端,这里只用到服务端就可以,使用本地复制模式的命令,通过1.189本地目录拷贝到1.160的共享上:rsync -avz --port=873 --delete --progress 源文件 目标目录
同样道理,如果在其他服务器安装客户端,可以通过客户端推送模式来推送文件到服务端上。
执行触发
inotify和rsync只是负责各自的工作,inotify负责监听,但是要如何触发到rsync来执行,则需要写脚本,本例子是使用Python来调用的。
由于服务端是较久的server 2008系统,只能安装较早版本的python,这里使用Python 3.6.0版本,官网下载就行。
安装和调试
inotify安装和测试
本机生成的inotify.exe文件拷贝到服务器c盘根目录,使用命令提示符即可测试,其中,服务器需要安装.net 4.0的运行组件才能正常运行: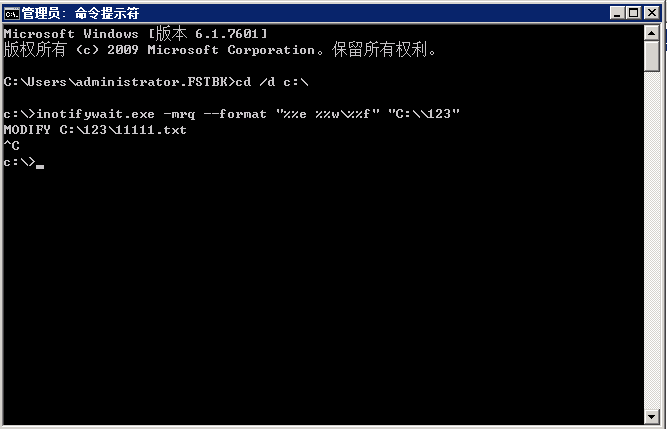
inotify的参数可以通过github网页获得,这里使用的是-mrq —format “%%e %%w\%%f”,输出事件名字+文件名+路径,如果对监听目录文件操作有输出,则说明软件能正常运行。
rsync安装和测试
直接双击安装服务端,安装过程会提示启用服务的用户和密码,可以使用默认的,该场景是本地传输,所以不用认证的参数。安装完后需要添加系统环境变量,之后同步的脚本执行命令时需要用到,添加的路径为默认的软件路径。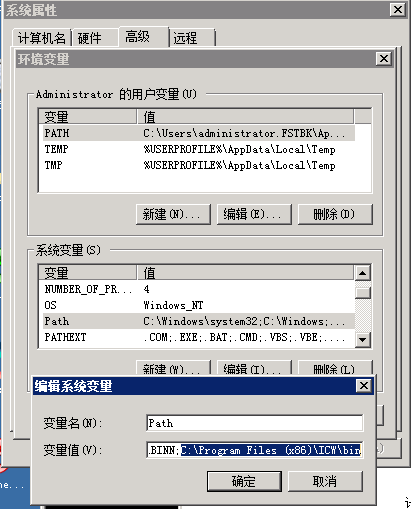
添加上系统变量后,就可以使用命令提示符直接运行测试: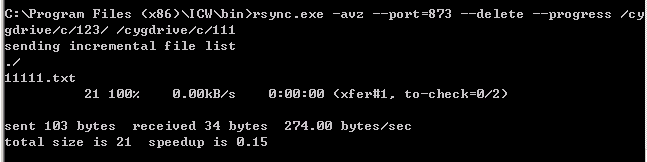
rsync.exe -avz --port=873 --delete --progress /cygdrive/c/123/ /cygdrive/c/111
需要注意的是,windows版的rsync指定源目录和目标目录时要以/cygdrive开头。
rsync的参数可以从官网获得。其中:
-a, –archive 归档模式,表示以递归方式传输文件,并保持所有文件属性
-v, –verbose 详细模式输出
-z, –compress 对备份的文件在传输时进行压缩处理
—delete 删除那些目标目录中源目录没有的文件
–-progress 显示备份过程
如果没有错误输出说明软件和设置是正常的。
使用python执行触发
先上脚本代码,该代码也是网上找的,修改适配python3.6或以上版本,使用subprocess模块来启动进程。
1 | #-*- coding: utf-8 -*- |
该代码还带邮件发送功能,因为没用到所以注释掉。
代码解析:
定义了四个变量,分别为rsyncSrc,rsyncSrc2,rsyncDes,listen
第一个和第二个变量都是源目录路径,只不过是给不同对象需要的表现形式不一样,通过popen来执行inotify程序,然后循环模块里获取inotify输出的信息,从而获得文件变化的路径,这个路径的输出格式跟第一个变量匹配,如果匹配成功,就根据事件来执行rsync程序,这时执行rsync需要的路径格式就是第二个变量和第三个变量了。
命令提示符运行测试,把代码保存为inotify+rsync.py:python inotify+rsync.py
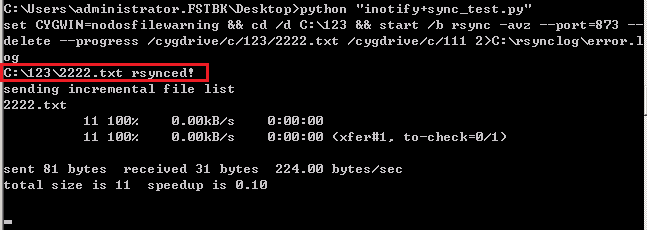
测试OK!